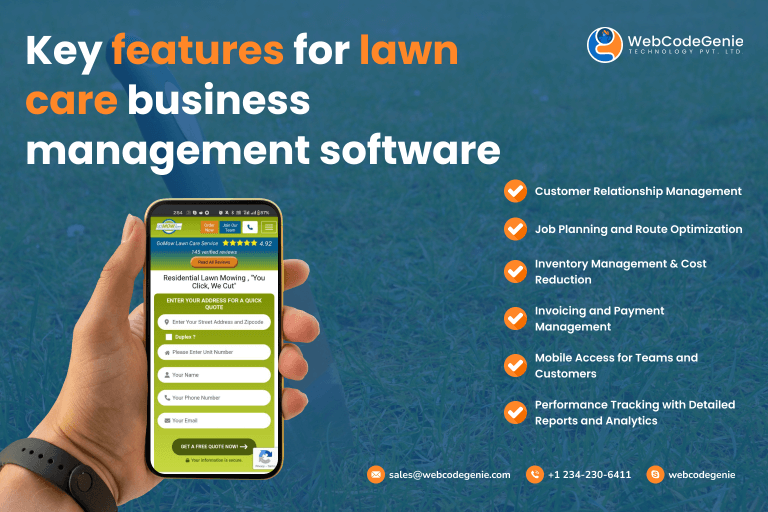
Web Development
 Mobile App Development
 Web Design
 Software Testing
 Digital Marketing
 IOT
IOT Big data
 Cloud Computing
 Blogs
Blogs Case Studies
 Portfolio
 Testimonials
 About us
 Life@WCG
 Contact us
Table of Content
What is Kubeadm?
Kubeadm is a tool used to build Kubernetes clusters, kubeadm performs the actions necessary to get a minimum viable
cluster up and running without complex configuration. It is developed and maintained by the official Kubernetes
community.
Kubeadm Setup Prerequisites
- At least two Ubuntu nodes, one is for the master and one is for workers with the below configuration.
- 2 GB or more of RAM per machine.
- 2 CPUs or more.
- Network connectivity between all nodes in the cluster public or private network is fine.
- Unique hostname, MAC address, and product_uuid for every node.
- Swap must be disabled.
- Below ports should be open.
- Master node (Control plane)
Protocol Direction Port Range Purpose TCP Inbound 6443 Kubernetes API server TCP Inbound 2379-2380 etcd server client API TCP Inbound 10250 Kubelet API TCP Inbound 10259 kube-scheduler TCP Inbound 10257 kube-controller-manager - Worker Node
Protocol Direction Port Range Purpose TCP Inbound 10250 Kubelet API TCP Inbound 30000-32767 NodePort Services
- Master node (Control plane)
Install CRI-O Runtime On All The Nodes
Container runtime is the basic requirement for a Kubernetes cluster. Kubernetes provides support for the below container
runtime.
- CRI-O
- containerd
- Docker Engine (using cri-dockerd)
In this installation process we will use containerd as container runtime, we will install containerd in all nodes
with the below steps.
Install Containerd
Download binaries from official github repo
wget https://github.com/containerd/containerd/releases/download/v1.7.9/containerd-1.7.9-linux-amd64.tar.gzExtract it under /usr/local
tar Cxzvf /usr/local containerd-1.6.2-linux-amd64.tar.gzCreate containerd.service unit file
cat <<EOF | sudo tee /etc/systemd/system/containerd.service
[Unit]
Description=containerd container runtime
Documentation=https://containerd.io
After=network.target local-fs.target

[Service]
ExecStartPre=-/sbin/modprobe overlay
ExecStart=/usr/local/bin/containerd

Type=notify
Delegate=yes
KillMode=process
Restart=always
RestartSec=5

LimitNPROC=infinity

LimitCORE=infinity

TasksMax=infinity
OOMScoreAdjust=-999

[Install]
WantedBy=multi-user.target
EOF
Enable containerd service
systemctl daemon-reload
systemctl enable --now containerd
Installing runc
Download binaries from official github repo
wget https://github.com/opencontainers/runc/releases/download/v1.1.10/runc.amd64Install
install -m 755 runc.amd64 /usr/local/sbin/runcInstalling CNI plugins
Download binaries from official github repo
wget https://github.com/containernetworking/plugins/releases/download/v1.3.0/cni-plugins-linux-amd64-v1.3.0.tgzCreate directory
mkdir -p /opt/cni/binExtract binaries
tar Cxzvf /opt/cni/bin cni-plugins-linux-amd64-v1.1.1.tgzLoad configuration
In this installation process we are going to use systemd as cgroup driver as so we need to enable SystemdCgroup for
containerd.
To enable SystemdCgroup first I need to generate a configuration file from the default config.
If /etc/containerd directory is not created please create it first.
containerd config default > /etc/containerd/config.tomlNow need to modify this config file and set SystemdCgroup to true
[plugins."io.containerd.grpc.v1.cri".containerd.runtimes.runc]
  ...
  [plugins."io.containerd.grpc.v1.cri".containerd.runtimes.runc.options]
    SystemdCgroup = true
Restart containerd service
systemctl daemon-reload
systemctl restart containerd
Verify Configuration of containerd
containerd config dumpForwarding IPv4
Execute the below commands in all nodes and follow instructions.
cat <<EOF | sudo tee /etc/modules-load.d/k8s.conf
overlay
br_netfilter
EOF

sudo modprobe overlay
sudo modprobe br_netfilter

# sysctl params required by setup, params persist across reboots
cat <<EOF | sudo tee /etc/sysctl.d/k8s.conf
net.bridge.bridge-nf-call-iptables  = 1
net.bridge.bridge-nf-call-ip6tables = 1
net.ipv4.ip_forward                 = 1
EOF

# Apply sysctl params without reboot
sudo sysctl --system
Verify that the br_netfilter, overlay modules are loaded by running below commands
lsmod | grep br_netfilter
lsmod | grep overlay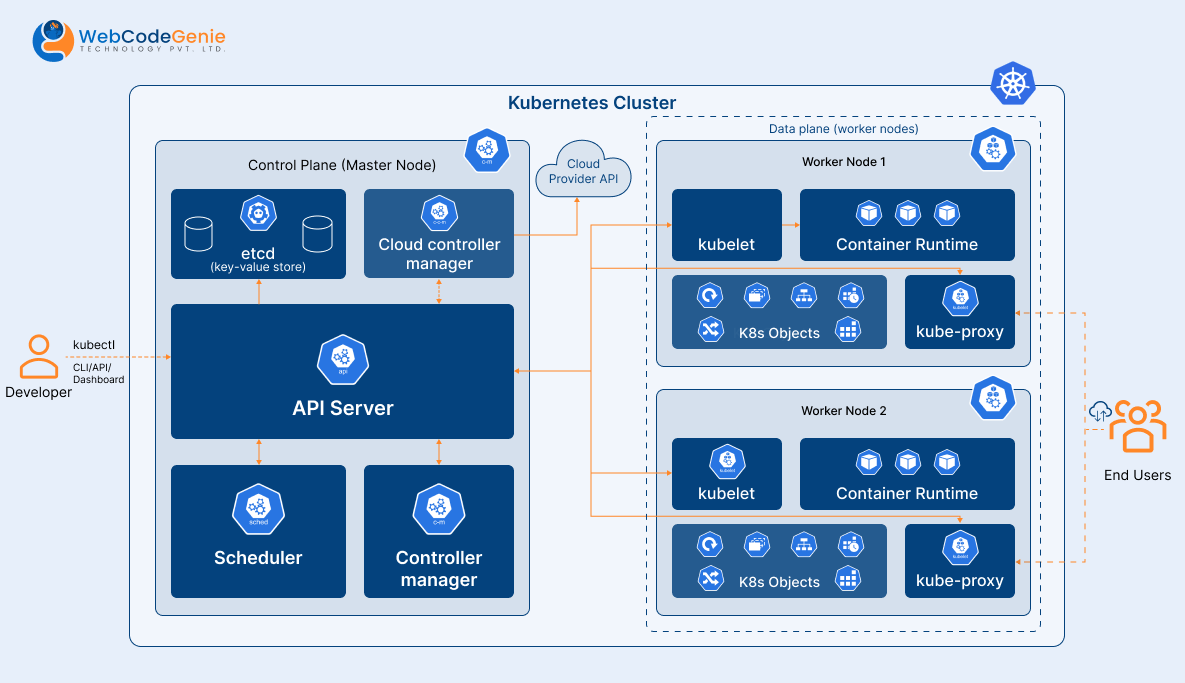
Installing kubeadm, kubelet and kubectl
For installation follow below steps in all nodes.
Update apt package and install required packages
sudo apt-get update
# apt-transport-https may be a dummy package; if so, you can skip that package
sudo apt-get install -y apt-transport-https ca-certificates curl gpg
Download the public signing key for the Kubernetes package repositories
curl -fsSL https://pkgs.k8s.io/core:/stable:/v1.28/deb/Release.key | sudo gpg --dearmor -o /etc/apt/keyrings/kubernetes-apt-keyring.gpgAdd the appropriate Kubernetes apt repository.
# This overwrites any existing configuration in /etc/apt/sources.list.d/kubernetes.list
echo 'deb [signed-by=/etc/apt/keyrings/kubernetes-apt-keyring.gpg] https://pkgs.k8s.io/core:/stable:/v1.28/deb/ /' | sudo tee /etc/apt/sources.list.d/kubernetes.list
Update the apt package index, install kubelet, kubeadm and kubectl.
sudo apt-get update
sudo apt-get install -y kubelet kubeadm kubectl
Initializing control-plane node
The control-plane node is the machine where the control plane components run, including etcd (the cluster database) and
the API Server (which the kubectl command line tool communicates with).
To initialize the control-plane run below commands in master node only
kubeadm init <args>In the above command <args> is optional, if you want some customization you can pass arguments, you will
find all arguments in this document.
One important thing is that if multiple CRI are installed in your system then you need to pass a socket file path
in the argument which you want to use as CRI for kubernetes, you have to pass socket file path in “–cri-socket”
argument.
Here I have listed default CRI path
- containerd : unix:///var/run/containerd/containerd.sock
- CRI-O : unix:///var/run/crio/crio.sock
- Docker Engine : (using cri-dockerd) unix:///var/run/cri-dockerd.sock
This command will give below output
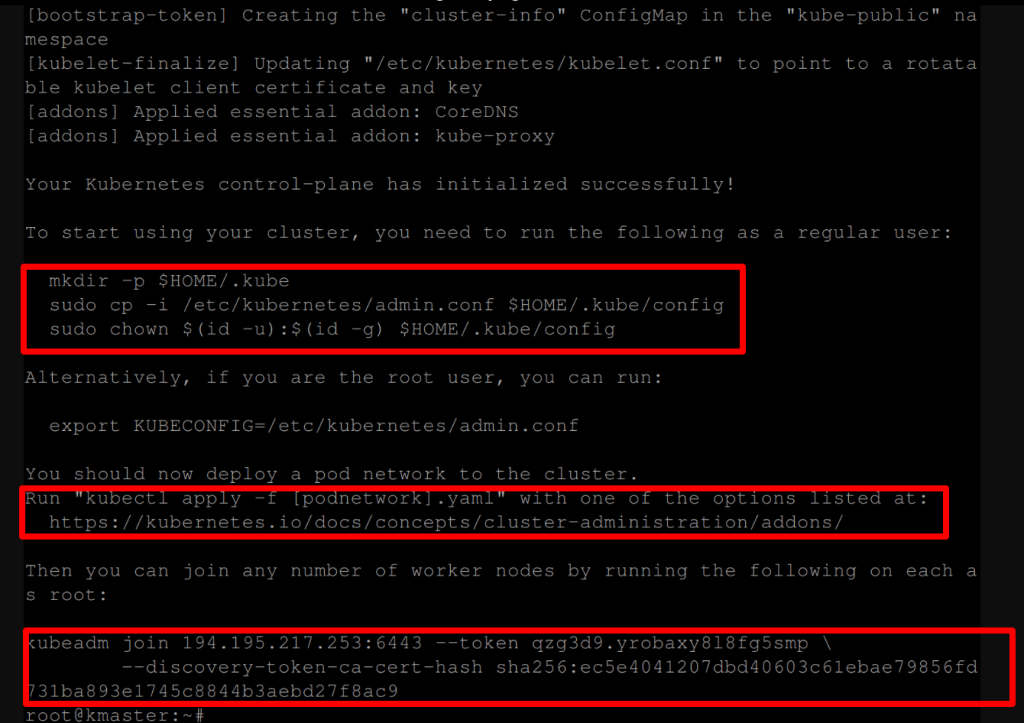
To make kubectl work for your non-root user, run these commands, this is the first highlighted section in the image.
mkdir -p $HOME/.kube
sudo cp -i /etc/kubernetes/admin.conf $HOME/.kube/config
sudo chown $(id -u):$(id -g) $HOME/.kube/config
Installing a Pod network add-on run below command, this is the second highlighted section in the image.
kubectl apply -f "https://github.com/weaveworks/weave/releases/download/v2.8.1/weave-daemonset-k8s-1.11.yaml"Joining your nodes, after the above 2 commands we will register worker node with master node (control-plane), you have
to run this command only in worker node.
kubeadm join --token <token> <master-host>:<master-port> --discovery-token-ca-cert-hash sha256:<hash>You can run this command in multiple workers to join with master node.
After running this command run below command to verify registered node
kubectl get node Above command will give the below output based on the registered worker node.

You can create a new token by using the below command on the master node.
kubeadm token createIf you do not have the token, you can get it by running the following command on the master node.
kubeadm token listIf you don’t have the value of –discovery-token-ca-cert-hash, you can get it by running the following command chain on
the master node.
openssl x509 -pubkey -in /etc/kubernetes/pki/ca.crt | openssl rsa -pubin -outform der 2>/dev/null | openssl dgst -sha256 -hex | sed 's/^.* //'By default, your cluster will not schedule Pods on the master node for security reasons. If you want to be able to
schedule Pods on the master node, run below command on master node. In this case you have to open 30000-32767
this port range on the master node also.
kubectl taint nodes --all node-role.kubernetes.io/control-plane-Installation and configuration completed, now you can create pod, service, deployment etc.
Here, we have installed kubernetes using kubeadm, but if you want to install kubernetes the hard way in a high
availability multiple master and multiple etcd database you can refer to this repo kubernetes-the-hard-way.
Conclusion
Great work! Now you’ve successfully launched Kubernetes with Kubeadm—it’s like building a solid base for your tech
adventure.
You’ve gone from setting up the cluster to getting your apps on board with Kubernetes. But here’s the exciting part:
it’s just the start! There’s a whole bunch of cool things waiting for you to explore and play within the world of
Kubernetes.